
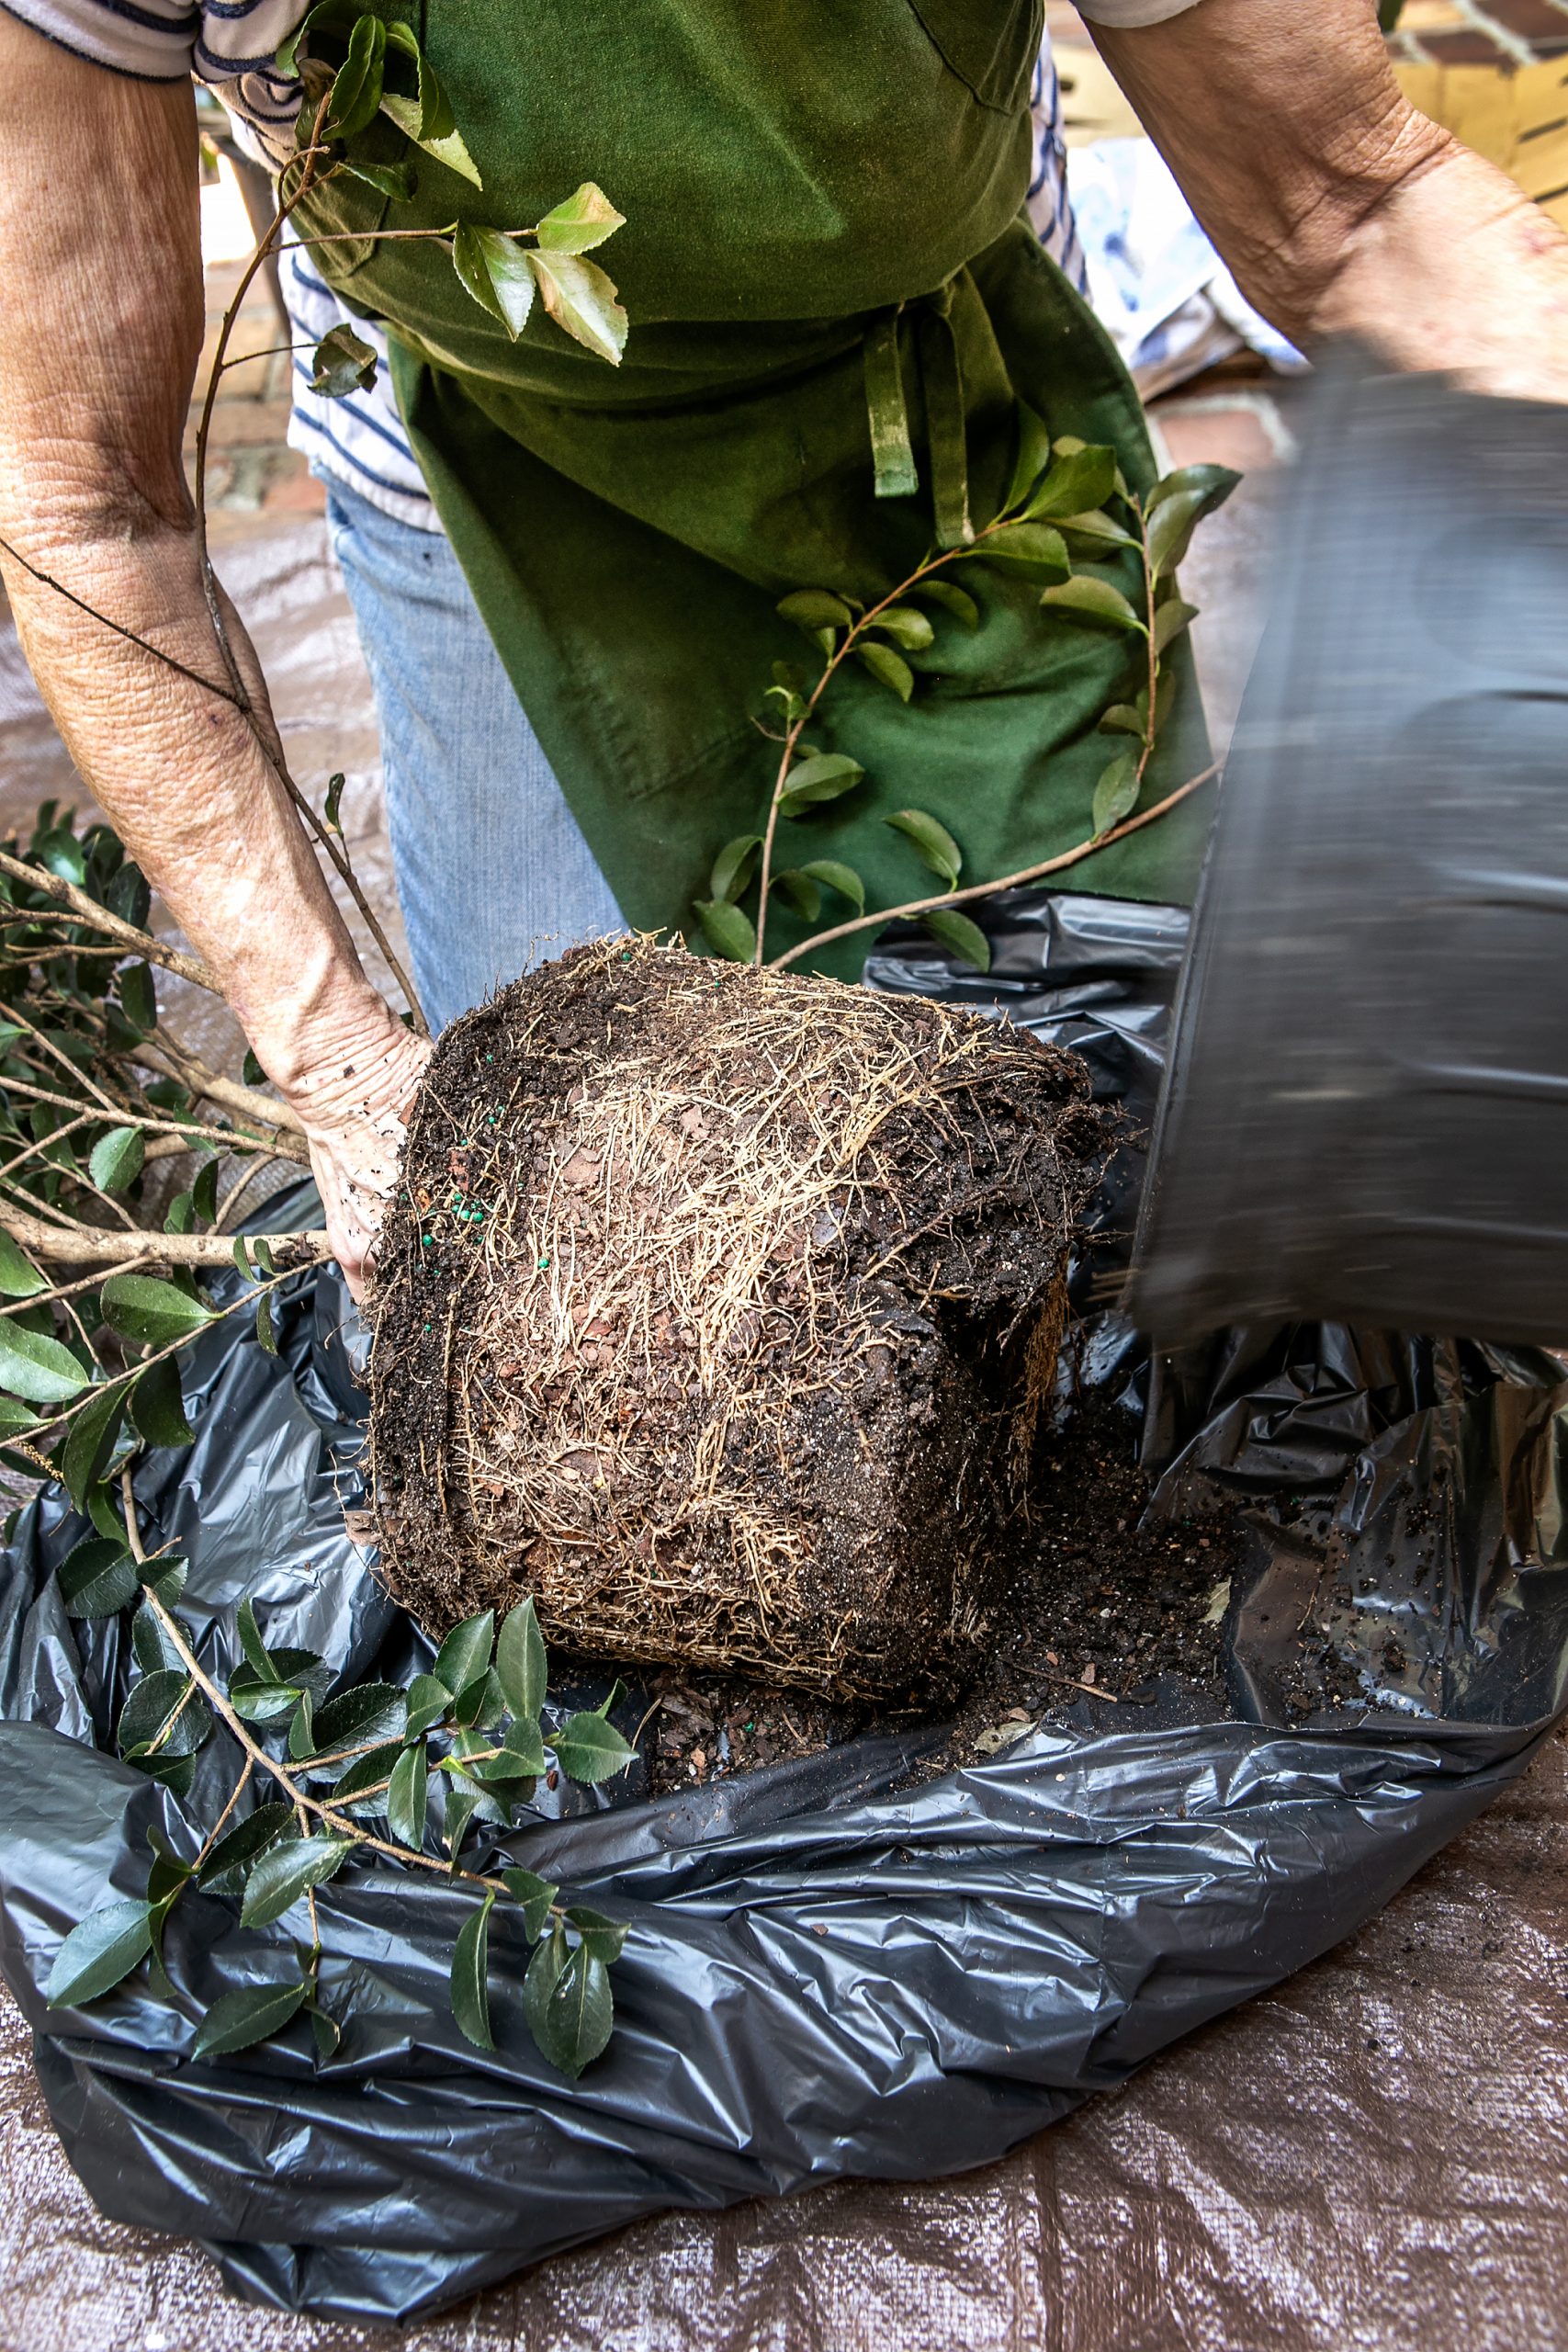
Amanda McNulty shows an example of an extremely compacted root ball and explains how plants are often choking in containers due to being root bound. If this were planted as it is, the roots would just grow in a circle and the plant would never be able to establish a large, healthy root system to take up nutrients and water.
While 3-gallon containers are the most popular size for purchasing plants to use in your home landscaping, what you see and think you’re buying may not necessarily be what you get these days. Several years ago, Agent Paul Thompson brought in to “Making It Grow” what appeared to be a very full and healthy woody plant in a 3-gallon container. When he removed the container and started checking for circling roots and excess soil over the root flare, he showed us that the nursery had put five rooted cuttings into one pot to create the illusion of a single plant that was ready to be installed in someone’s landscape. The recommended planting space for each plant was 5 feet on center. If the shrubs had been planted as they came, they would have grown some but eventually started dying back, never becoming the desired specimen plants.
Nursery production is not a high-end business; the competition between traditional nurseries that often root their own cuttings and appropriately move them into larger pots as the plants grow is contrasted with others compelled to contract with big box stores whose buyers negotiate for the lowest possible price. The result is a race to get plants of a certain size to the market as soon as possible — the most desirable for homeowners usually being a 3-gallon container.
The best practice for healthy plant production is to start rooted cuttings in small containers and move them into slightly larger ones several times before selling them. The big box workers need to repot as many plants as possible, which invariably leads to extra soil being placed over the juncture of the woody top of the plant and the root ball, an intersection called the root flare.

Most of us choose 3-gallon containers when we’re doing the planting ourselves. The new plant is big enough to make a statement in the landscape and still be a manageable size to get into the ground. This past spring, Edward and I spent almost all the money we don’t have to repaint our 180-year-old wooden house in Saint Matthews (for older Columbians, it was built by the late Dr. Phillip Fairey’s father) and removed nearly 60 feet of an overgrown 20-foot-high cleyera hedge. When our house was built on 2½ acres, the family placed it right on a corner as the only traffic came from horses and buggies. Now the street is a busy thoroughfare, and I wanted to install evergreen plants with a mature height of 8 feet or so to give us some privacy and reveal a little of our now presentable home.
The planting space is narrow; about 6 feet between the road and sidewalk and a line of large trees. I chose white semi-double sasanqua camellias for the front, which is shady, and podocarpus for the side. To prepare each selection of plants before installing them, I took somewhat drastic steps I will explain.


Woody perennial plants and trees have a division of tissue at the juncture of stem and root called the root flare. The woody base of the plant flares out slightly as it transitions into root tissue. This intersection should be planted a bit higher than the soil line. Stem tissue should stay dry while root tissue should be damp. Also, plants get oxygen for their respiration cycle, which converts the carbohydrates they make during the day into energy for other physiological pathways, from pore spaces in the soil. As you go deeper into the ground, the movement of ambient air declines, less oxygen is available for this critical process.


Unless you are amending a huge planting area, the native soil is the best medium for any plants you add. If you dress up a planting hole with peat moss, pine bark, or compost, all of which are organic matter and highly degradable in our moist, warm climate, they will be broken down by microorganisms and the soil level will sink. To make matters even trickier, that organic matter holds water longer than the surrounding native soil, so your plant is trying to grow in a bowl of oatmeal — all the pore spaces, half of which usually hold water and the others containing the ambient air source of oxygen — are filled with water and your plant suffocates. Mulch should extend two to three times the size of your planting space and be 2 to 3 inches deep when well settled. It should not touch the plant stem — avoid volcano mulching. It rots stem tissue and is a haven for plant-eating voles.
Fertilizer, especially nitrogen fertilizer, promotes leafy tissue growth. Your plant, which was being watered often multiple times a day in a nursery, is now having to develop a vastly expanded root system to support the top growth. Do not apply any fertilizer at all the first year; after that, find a slow-release fertilizer with a ratio having a lower middle number than the most commonly found 10-10-10. The numbers in order represent the available amounts of the macronutrients N P K that are essential for plant growth. But nitrogen (N) and potassium (K) are highly water soluble and wash away with rainfall or irrigation. Phosphate (P) is held tightly by the soil compounds, and soil tests from across the state are showing excessive levels of that essential, but not mobile, nutrient. You may even want to order a large bag of slow-release fertilizer from your nursery or online to get one with a well-balanced ratio.
So back to my yard’s makeover. The 18 semi-double (which means they have sexual parts and support pollinators) sasanquas, which came in 3-gallon containers, looked lovely. But when I took them out of the containers, I found that they had been in the pots far longer than optimal and had a dense root ball that was several inches above the root flare and was filled with woody circling roots.
The potting medium was mostly pine bark and that needed to be removed. As I mentioned above, an organic medium will quickly decompose in our warm, moist environment and the plant will end up sinking in the soil, with your plant lower in the ground than is optimal. Also, we’ve found that several noxious weeds, particularly gripe weed and mulberry weed with their explosive seed pods, are almost always found in that potting medium. Even for an annual plant, try to remove at least the top 2 inches of soil, put it in a plastic bag and discard it in your trash.
Any roots above the root flare must be cut away to expose it so when you place the plant in the ground that juncture is right at or slightly higher than the soil line. Roots that are growing in a circle are not going to change direction miraculously when placed in the ground — you must either use your fingers to tease them apart if they are friable and non-woody, or, as in my case, I had to make several vertical cuts into the root ball with my Sawzall and still had to remove some extremely woody and circling roots with my Felco pruners. I ended up with a drastically reduced root ball. In order to restore some balance between the roots and top woody growth, I pruned about a third of the top back, making cuts that encouraged outward growth for better light and air movement.
I used a 2½-pound mattock to dig a hole three times wider but no deeper than the now much smaller root system and placed the plant with the root flare slightly above the soil line. I gently tapped down the native soil and mulched with several inches of pine straw, being careful to keep the mulch several inches away from the stems. Watering is critical. You can purchase shrub-bags that will slowly release water into the soil. Or, if you’re on a budget like me (you really can’t imagine how expensive it is to paint a wooden house with wraparound porches), you can buy plastic buckets and drill a small hole in them and let them drip, drip, drip water for your plant. Spray-paint the bucket black, and it will almost disappear — and if you put a brick in it, it won’t blow away in a big storm.
The podocarpus had three 1-gallon plants stuck into a 3-gallon container; they hadn’t even grown together, which was a blessing. Poor Edward, who is 79, was counting on having a pretty good-sized hedge of plants as a buffer between us and the street. Instead, he’s looking at 14 small 1-gallon individuals lining up that space, and we have 28 left to repot, keep alive, and figure out how to use in the future.
Even for herbaceous perennials, experts are suggesting we “wash” the roots to reveal if they are too compact and to remove the potting medium, which probably contains weed seeds and will have incompatibility issues with your native soil — unless you are planting in containers filled with a potting medium. The salvias I planted had a very tight root ball that I loosened considerably, and I did cut back the top. It will quickly regrow and bloom until frost. If I had gotten them as soon as they came to the nursery, the root ball would probably have needed very little teasing, but I still would have removed as much potting medium as possible. “Washing the roots” is the term for this now more widely suggested practice.
Your local nursery gets plants from lots of sources, and they have trained staff who are there for a purpose — to guide you and give advice. Talk with them and ask them to help you examine plants when you’re shopping. They, too, are often unaware the plants they get from very reputable and well-established growers may have some of these problems. You are now armed with knowledge and can address issues that the plants you buy may have so they will have the proper amount of space and can grow to their mature size instead of having a life shortened from competition.