
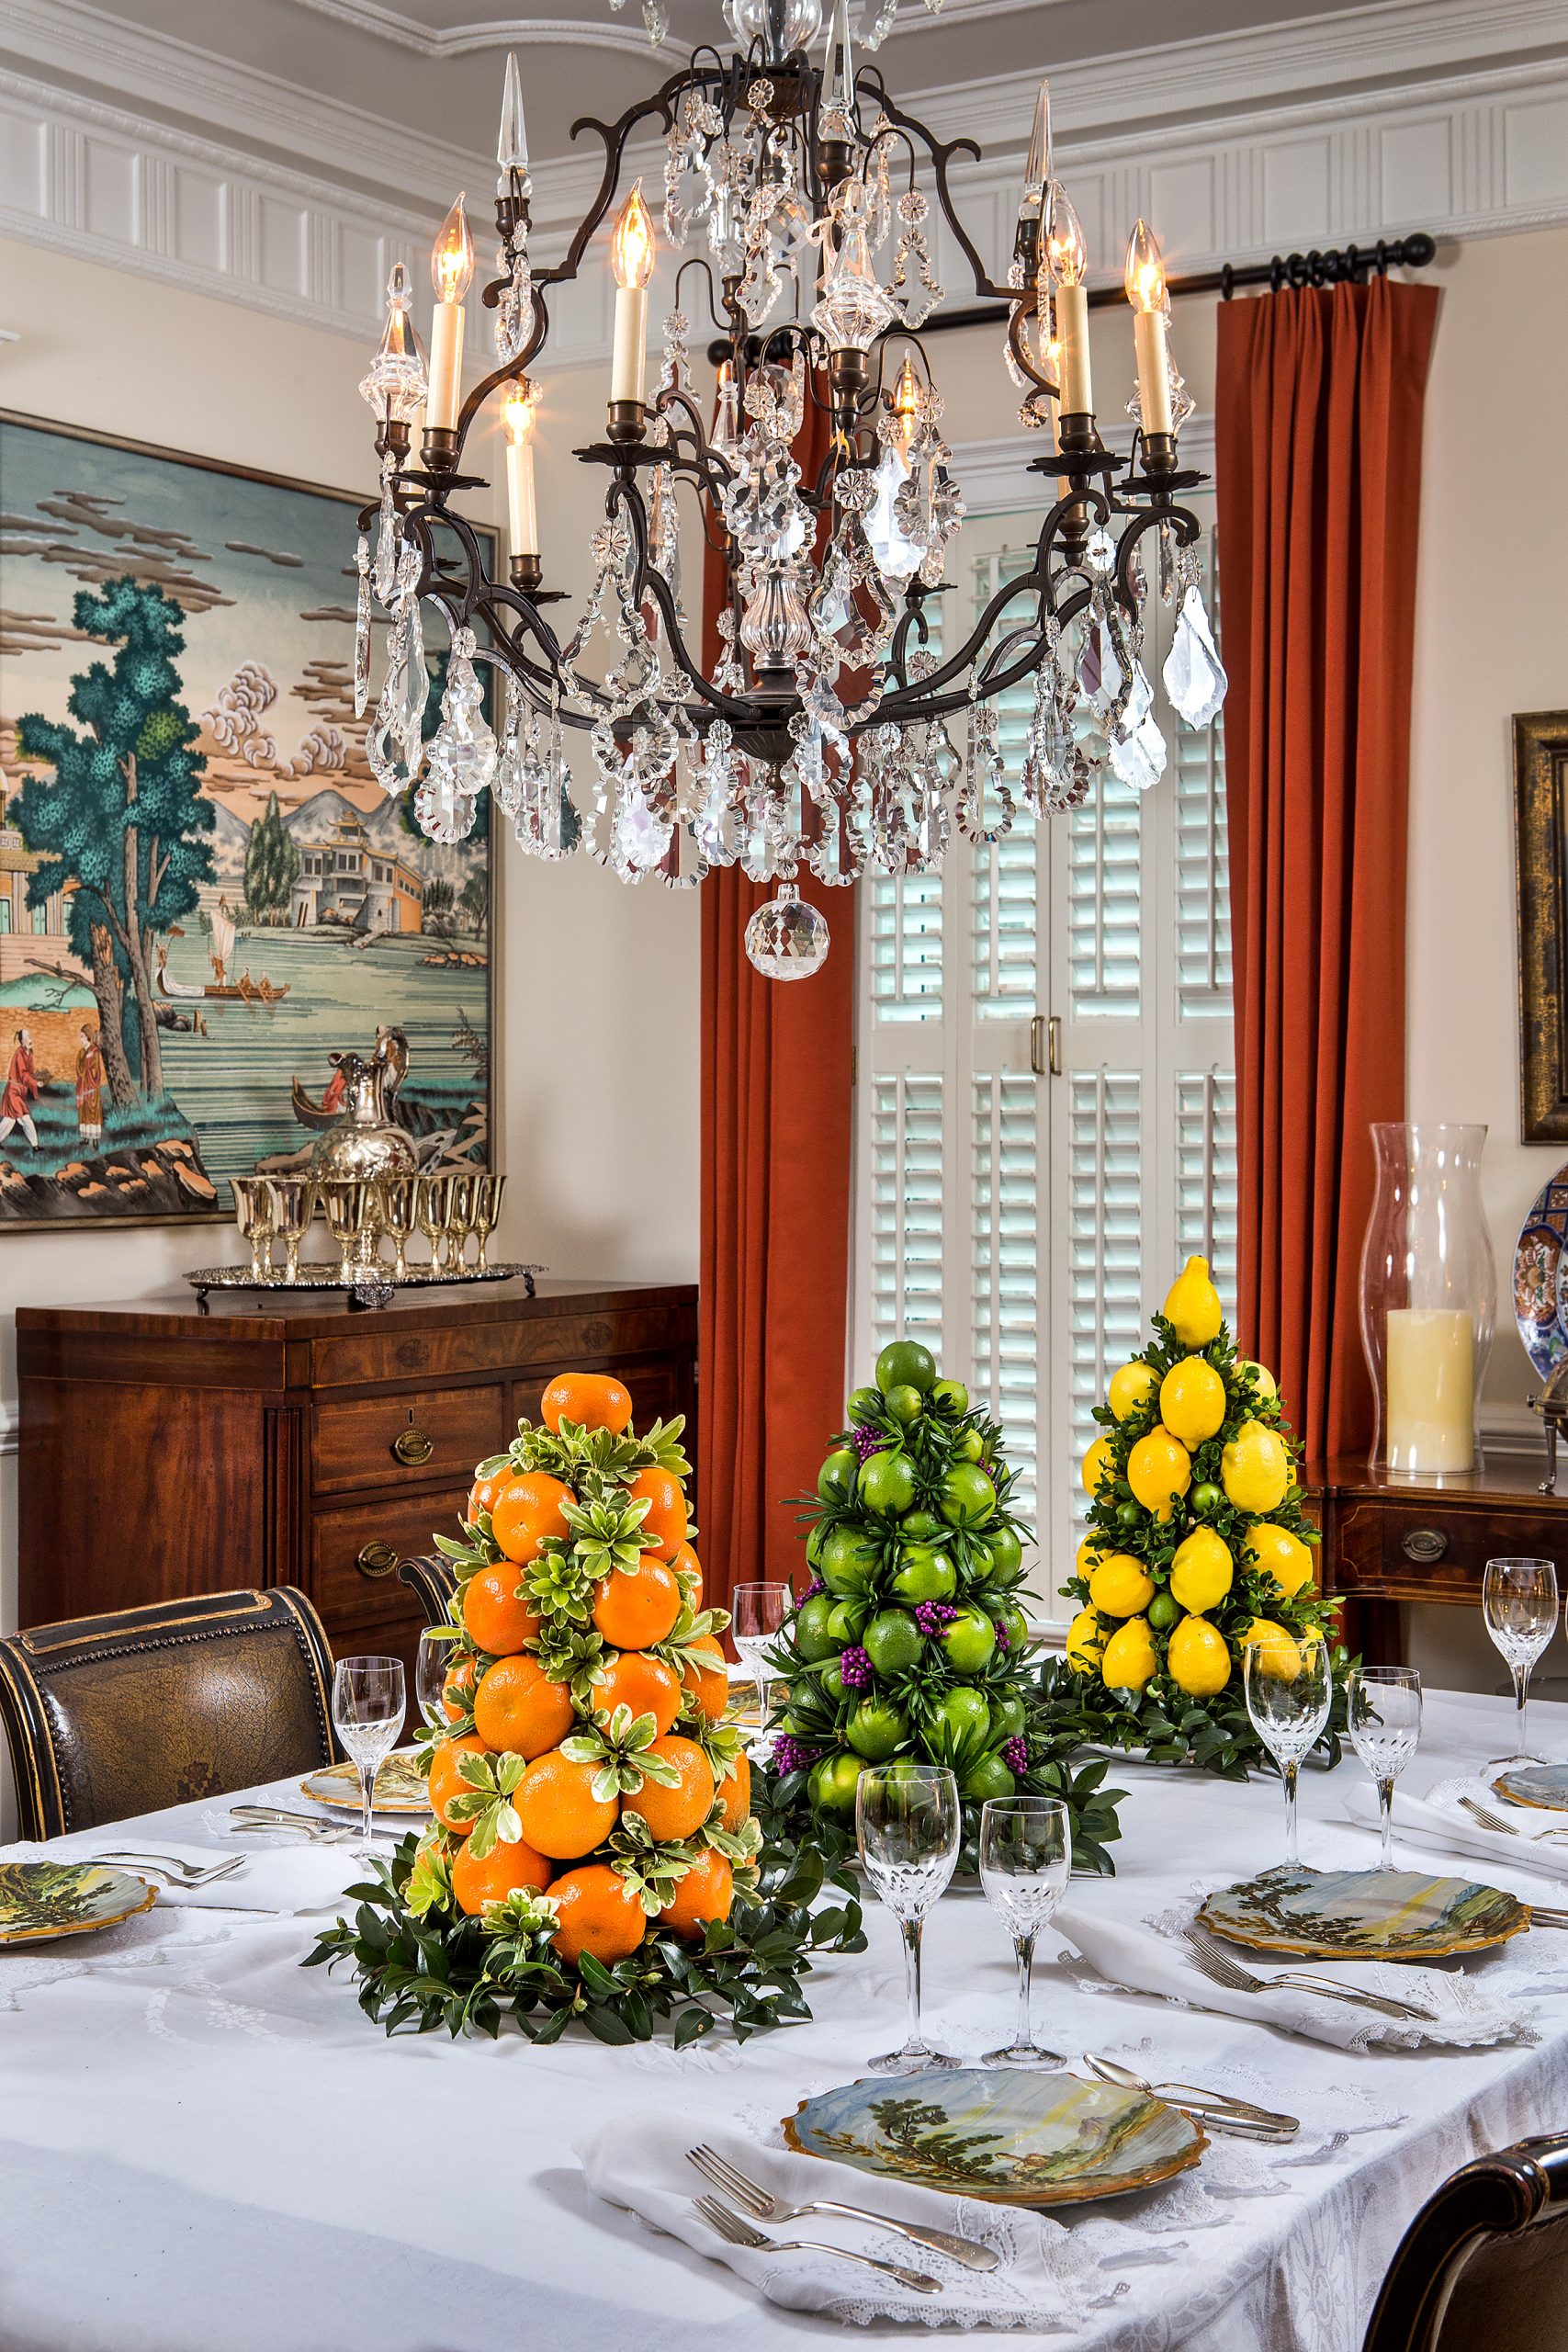
Using lemons, limes, and oranges, the artful and elegant addition of fruit topiaries to the Thanksgiving table will render your gathering into a glorious festive affair.
Can it really be Thanksgiving if Carolina isn’t going to play Clemson? Since we’re not philosophers, we’ll have to skip that weighty question and move forward in the knowledge that the 2020 calendar still has Thanksgiving marked out as a national holiday and proceed with our celebrations accordingly.
Like every other event in this year of the coronavirus, the way we celebrate the beloved holiday of Thanksgiving will certainly be affected. The guest list may be shorter or travel plans may be altered, but certainly we have many things for which to be thankful. And who would want to miss out on Thanksgiving dinner?
No matter the size of the gathering, this holiday is all about celebrating the blessings from above, so what else exemplifies the bounty of the season more than beautiful fruit in all of its glory? And since many (many, many) trips to the grocery store will be required, we might as well be efficient and buy the main elements of our decor while we’re doing the rest of our shopping.

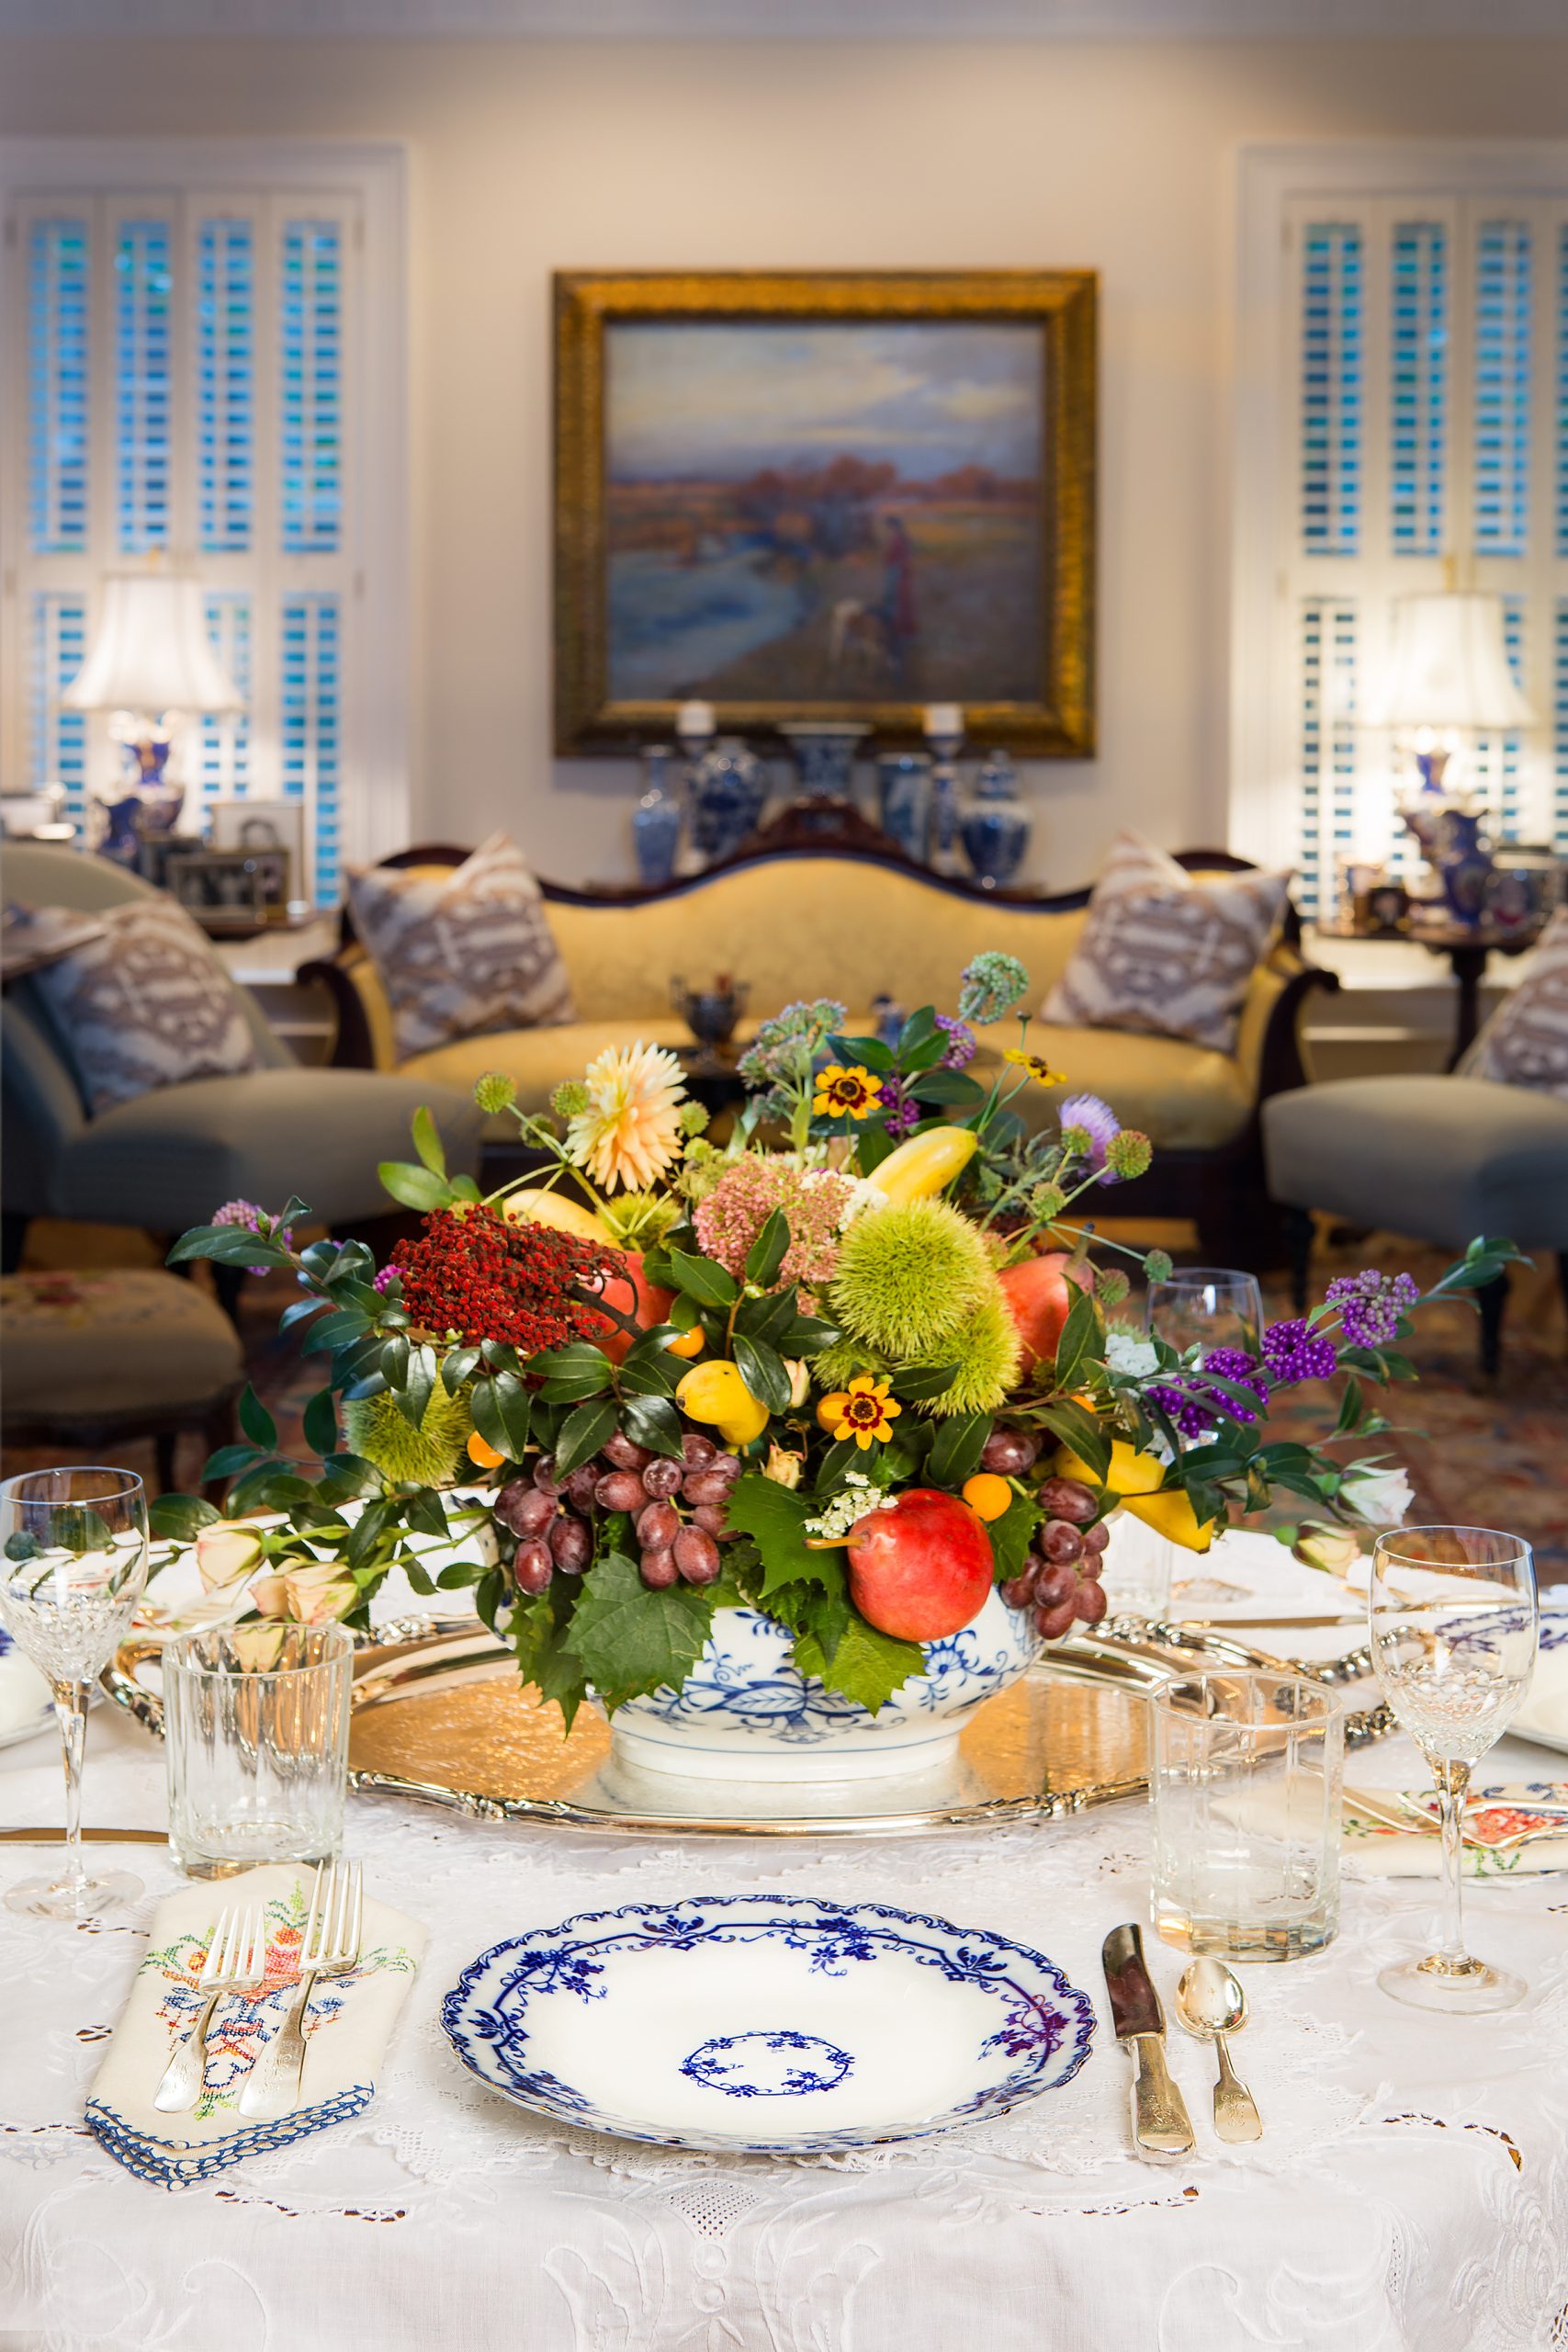
Let’s start with a traditional centerpiece — one that is low enough to see over, compact enough to leave lots of room on the table for important things like turkey, and hardy enough to be made three or four days before Thanksgiving. The vibe that we want to channel here is that of a Dutch master still life painting of a fabulous flower arrangement with seemingly every fruit, flower, and bird that has ever been discovered represented.
Step one in creating this lush Thanksgiving masterpiece is to gather up the necessary materials. On one of your many, many trips to the grocery store for the big day, keep a sharp eye out for beautiful colors and interesting shapes while you’re in the produce section. A pear in a striking red color, a plum that’s speckled and green, a dragon fruit with its bright pink color and unusual texture, or grapes that drape in just the right way — anything that catches your eye can be a useful part of the design.
The second step of gathering happens in the great outdoors and can be a pleasant break from your other preparations as well as a chance to cultivate thankfulness as you take a few minutes to be out in nature and see all of the beauty and variety that has been created. When you’re outside, take the time to look around you for eye-catching shapes and colors. You might notice a magnolia cone that has turned a pretty shade of pink, or you might see a seed pod in an unusual shape or a tall grass that has gone to seed in an attractive way. If you or a friend has a garden, one or two of the very last blooms of the year may be making a final show before the season ends. If you’re fortunate enough to find a vine, like wild grape or smilax, cut about 6 feet of that and add it to your materials stash. These treasures that you gather up may not look like much on their own, but put together they will work their magic in the arrangement you create to tell the story of the bounty provided to us.

The other items that you will need to have on hand to begin your project are a container, a block or two of green Oasis flower foam, some squared off U-shaped flower pins, floral wire, bamboo skewers, and clippers. Once you have gathered all you need, fill up a sink or a small plastic tub with water and let your Oasis soak for about 10 minutes while you get all of the other pieces out onto your workspace – probably the kitchen counter. Transfer the soaked Oasis into the container you have chosen as the base for your centerpiece. The top of the Oasis should stick up a couple of inches above the rim of the container, so you may need to use more than one block to achieve the height you desire. Oasis is very easy to cut, so if two blocks are too high, you can cut a bit off the top.
Begin by winding the vines around the part of the Oasis that rises above the container using the “U” pins to secure them as you go. This will form a base for your design, and the leaves will camouflage the Oasis. Since grapes naturally drape, this is a good time to add them using the pins to attach them on top of the vine layer.


Now we’re ready to move the adventure into high gear by actually creating the centerpiece. Put one end of a cut piece of the bamboo skewer into the side of one of the larger fruits, like a pear or an apple, and attach the fruit to the arrangement by putting the stick into the Oasis. Repeat the process with a few more pears and/or apples, angling some of the fruit down, some to the right, and some to the left until you have the outline of the centerpiece. Work your way from the bottom to the top, incorporating smaller fruits as you go. Gaps will be visible at this stage, and your design might even look a little hopeless, but don’t be discouraged — just keep going. Remember we’re creating something for the enjoyment of our family and guests that points to all that we have to be thankful for, so perfection is not the goal.
To finish the design, use the natural elements from your walk to add interest and texture, filling in any gaps left between the larger pieces of fruit. At this point, you’re very close to being finished – just stand back and take a look at your gorgeous creation from all sides. If you can see the Oasis or a noticeable gap, choose a fruit or a flower that will fit the space and pop it in. Now stand back one more time and heave a sigh of satisfaction for a job well done.
Fruit topiaries have waxed and waned in popularity since Colonial times. This design can be particularly helpful if you are moving your Thanksgiving dinner outside since it works in multiples, and it doesn’t take too long to make. In recent years, we’ve seen the growing popularity of harvest dinners set up on a series of long narrow tables with white tablecloths fluttering in the breeze, and this arrangement really lends itself to our current circumstances since the venue is outside and the chair placement keeps people separated. The fruit topiary, which in its most traditional version is a cone shape decorated with apples and boxwood, can easily be adapted to work for Thanksgiving by substituting one or more citrus fruits for the apples for more of a fall color palatte, and any greenery that you have growing in your yard can be a substitute for the boxwood.
The supplies you will need are one block of Oasis for each topiary, bamboo skewers, bags of citrus, greenery cut into 2 to 4-inch pieces, clippers, and a knife. First, soak the Oasis in water. When it’s nice and wet, stand it up vertically on an inverted small plate or an upside-down flowerpot saucer, trying to match the plate size to the Oasis. Using a knife, cut off the corners of the Oasis, angling down as you go to form a cone shape that is narrower at the top and broader at the bottom. Don’t spend too much time trying to make this a perfect cone — just get the general shape and it will be fine.
Next, put a cut piece of a skewer into the center of a piece of fruit and push the other end of the skewer into the Oasis. Start at the bottom and, leaving a small space between pieces of fruit, make a row around the base of the cone. Now move up and make a second row, then a third row, and so on until you’ve reached the top of the cone where one last fruit is placed. The final step is to fill in the spaces between the fruit by pushing the stems of the small pieces of greenery into the Oasis until the Oasis is covered. The finished work of art may leak a little bit, so it will need to sit on something to protect your table.


If the materials are cut ahead of time by an adult, then this design is easy enough for children to assemble or, alternatively, if you’re looking for a way to entertain your crew while the turkey finishes cooking, then making topiaries could be a fun group activity. Just set up a work table with all of the supplies and wait to be amazed by what your family members create.
You can achieve the same design using a dry foam form and Styrofoam fruit. If you go the faux route, then the designs can be made weeks ahead of time, and they can also be stored to be used again next year. The Styrofoam lemons, limes, and apples are very attractive and come in a nice variety of sizes. Small faux pumpkins are also made that look very real and would make an interesting topiary.
We have just finished making some very beautiful decorations for the main table so now we can relax and be a little bit whimsical as we consider how we want to use fruit to entertain the children at their table. Certainly, the most traditional Thanksgiving icon is the turkey, so let’s use that as a starting point as we make one more pass through the produce section of the grocery store, knowing that from here on, the silliness level is going to get pretty high.
Two possibilities for a turkey base (using a lot of imagination) are artichokes and pineapples. Step one is to remove most of the pineapple leaves by using a sharp knife to cut into and around the leaf stalk. When you’ve made it all the way around the base of the leaves, then take the stalk in your hand and twist. This should leave an opening at the base with a “collar” of short leaves — this will become the base of the neck — and you should have a stalk made up of longer individual leaves in your hand. Make a pile of the individual leaves and on the end of the turkey opposite the neck, pin the leaves (to look like tail feathers) to the pineapple using the “U” pins from our earlier project. Make three or four rows of feathers and you should start to see the turkey appear. The turkey head can be made from a magnolia cone, a small brown pear, or a likely looking seed pod. Your head of choice can be attached using the pins or one of the bamboo skewers, depending on what you choose for a head. Black straight pins or beans can be the eyes, and a nice skinny red pepper can be the wattle that hangs over the bill. I warned you that things were going to get a bit silly! If the turkey wants to tip over, prop him up using some of the extra small leaves.
For artichokes, the stem end is the back, and the pointy end is the front. Sit the artichoke on the table in a way that the stem balances it. Starting near the stem end of the artichoke, turn a few rows of leaves inside out so that they stand up and look like feathers. Next wiggle open the leaves on the pointy end and insert the turkey’s head — a small magnolia cone works well. Again, black straight pins work well for eyes and a skinny red pepper is an effective wattle. If you really want to go the last mile, you can cut a small piece of the rib of a star fruit to make a wonderful beak.
When the turkey platter has been dried and put away, the last piece of pecan pie has mysteriously disappeared, and you really don’t feel like getting the Christmas decorations down just yet but you feel that you should, here’s the perfect solution. In addition to being beautiful Thanksgiving decorations, topiaries are also the perfect bridge into the Christmas season. All you have to do is to take the Thanksgiving fruit off the topiary and replace it with apples, and before you can say “ho, ho, ho,” the first Christmas decoration is done!